Showing posts with label Download. Show all posts

Sunday, June 5, 2011

Have You Started Broadcasting on YouTube?

Greetings,

Today I am so excited to let you know that I am now on YouTube. That’s right I have created my own broadcasts  or TV shows on YouTube. You can share ideas, how to videos and resources for free on YouTube.  To check out my channel, you can click on the picture above or simply click here.  As of today, I have posted 13 videos with more to come over the summer.

You can start your own broadcast with a digital camera and using Windows Movie Maker.  You can check out the blog article I wrote November 29, 2009 for the free online tutorial.  If you have the new Windows Live Movie Maker that comes with Windows 7, then click here for a free video tutorial or click on the video below.


Once you have viewed that tutorial and tried a few of the exercises, you can visit this second video tutorial by clicking here or clicking on the video below.


For more video tutorials click here.

To start your own YouTube channel simply visit: http://www.youtube.com/   and follow the instructions on how to start your own YouTube account. If you are an elementary, middle school or high school student, make sure you get your parents permission before starting your own YouTube channel.

Students remember never to give out any personal information online such as your real name, city, address, age or school. I hope you enjoy my videos I have posted on YouTube. I will be sharing more videos in the future.

If you want to start downloading any YouTube videos, make sure you check out my article I wrote on May 3, 2010.  This article will give you all the details you need to start you own library of videos.  We will see you next week with another exciting topic.  Take care.
readmore »»  

Sunday, April 10, 2011

Great Student Centered Activities (Grades 4 - 5)

Greetings,

I hope you had a great week. I know a lot of the fourth and fifth grade teachers have been waiting for this blog article. In this blog article, I will be sharing with you the free student centered activities for grades 4 - 5.
The Student Center Activities for Grades 4 - 5 include three books and one DVD: The DVD is broken up into 6 parts. Here are the three books:

1. Advance Phonics and Fluency Student Centered Activities
2. Vocabulary and Comprehension Student Centered Activities
3. Teacher Resource Guide

1. Teacher Resource Guide

Part 1: Five Components of Reading Instruction, Frequently asked Questions, Implementing and Managing Student Centers in the Classroom, Interpretation of Activity Plans, Implementation of Activity Plans

Part 2: Crosswalk, 2-3 Glossary of Reading Terms

Book 1: Advanced Phonics and Fluency (8 Page PDF)

A. Advanced Phonics

Part 1: Variant Correspondences (62 Page PDF)

Part 2: Syllable Patterns (48 Page PDF)

Part 3: Morpheme Structures (88 Page PDF)

B. Fluency

Part 1: Word Parts & Words (70 Page PDF)

Part 2: Phrases, Chunked and Connected Text (44 Page PDF)

Book 2: Vocabulary and Comprehension (8 Page PDF)

A. Vocabulary

Part 1: Word Knowledge (60 Page PDF)

Part 2: Morphemic Elements (60 Page PDF)

Part 3: Word Meaning & Analysis (80 Page PDF)

Part 4: Words in Context (48 Page PDF)

B. Comprehension

Part 1: Narrative Text Structure (64 Page PDF)

Part 2: Expository Text Structure (60 Page PDF)

Part 3: Text Analysis (40 Page PDF)

Part 4: Monitoring for Understanding (66 Page PDF)

To download all the resources and to view the DVD parts for FREE, click here.

Ok, I hope you enjoyed all the valuable resources on all the Student Centered Activities you can make and use for interventions with your students.  Remember all these activities have been researched through the Florida Center for Reading Research. 

For more information or to view their Mission Statement, simply click on the blue link above this sentence.  I will see you next week with another exciting topic.  Take care.
readmore »»  

Sunday, April 3, 2011

Great Student Centered Activities (Grades 2 - 3)

Greetings,

I hope you are doing well.  I know you a lot of the second and third grade teachers have been waiting for this blog article.  So, let's get started.  Today I am sharing with you the free reading student centered activities for grades 2 - 3.

The Student Center Activities for Grades 2 - 3 include three books and one DVD: The DVD is broken up into 6 parts.  Here are the three books:

1. Fluency, Vocabulary, and Comprehension Student Center Activities

2. Phonemic Awareness and Phonics Student Center Activities

3. Teacher Resource Guide

1. Teacher Resource Guide

Part 1: Five Components of Reading Instruction, Frequently Asked Questions, Implementing and Managing Student Centers in the Classroom: System one, Implementing and Managing Student Centers in the Classroom: System Two, Interpretation of Activity Plans, Implementation of Activity Plans

Part 2: Crosswalk, 2-3 Glossary of Reading Terms

Book 1: Phonemic Awareness and Phonics (8 page PDF)

A. Phonemic Awareness

Part 1: Phoneme Matching & Phoneme Isolating (64 page PDF)

Part 2: Phoneme Blending & Phoneme Segmenting (56 page PDF)

Part 3: Phoneme Manipulating (29 page PDF)

B. Phonics

Part 1: Letter Sound Correspondence (56 page PDF)

Part 2: High Frequency Words (72 page PDF)

Part 3: Variant Correspondences (132 page PDF)

Part 4: Syllable Patterns (56 page PDF)

Part 5: Morpheme Structures (36 page PDF)

Book 2: Fluency, Vocabulary, and Comprehension (10 page PDF)

A. Fluency

Part 1: Letter Sound Correspondence & Word Parts/Patterns (82 page PDF)

Part 2: Words (12 page PDF)

Part 3: Phrases & Chunked Text (38 page PDF)

Part 4: Connected Text (18 page PDF)

B. Vocabulary

Part 1: Word Knowledge (62 page PDF)

Part 2: Morphemic Elements (38 page PDF)

Part 3: Word Meaning (20 page PDF)

Part 4: Word Analysis (52 page PDF)

Part 5: Words in Context (28 page PDF)

C. Comprehension

Part 1: Narrative Text Structure (34 page PDF)

Part 2: Expository Text Structure (18 page PDF)

Part 3: Text Analysis (32 page PDF)

Part 4: Monitoring for Understanding (38 page PDF)

To download all the resources and to view the DVD parts for FREE, click here.

Ok, next week I will be sharing with you the grades 4 - 5 reading resources. I hope you have a great week. Take care.
readmore »»  

Sunday, March 20, 2011

How to Promote Your Animoto Video: Part 4 of 4

Greetings,

I hope you had a great Spring Break 2011.  Today I am sharing with you how to promote your video using the animoto features. I will also be sharing with you additional video hosting sites you may want to use. Alright let's get started on how to promote your animoto video.

As you can see in the picture below, you want to click on your My Videos tab at the top left of the screen and it will take you to your videos page.  You will need to click on the Green Actions button and you will see the following choices listed in the picture below.


 Once you click on the Download button you will be taken to the following screen below.  Now you are ready to save your video to your computer.
 Your video will be saved as a MPEG movie that can be played using Quicktime or any type of software that allows you to play MPEG files.  Choose Save and select a a location you want to save it to.


 You can also choose to share your video.  Look at the picture below and select the Share option.

 After you click Share, you will see the following screen.  This will give you the choice to post your video to many video sharing web sites such as Facebook, MySpace, Twitter, Blogger and many more.  You can also choose to share your video link via Email.

 You can also chose to Export your video to additional video sharing sites.


Down below you will see two video sharing options that you can select from to share your video.


 You can also post your video in your blog or another web site by choosing the Embed option.


 To embed the video, you will need to copy and paste the code into your site or blog that accepts HTML
.

Other ways to promote your video include posting to the following video hosting sites: http://www.teachertube.com/, http://www.schooltube.com/, http://www.video.google.com/, http://video.yahoo.com/, http://www.metacafe.com/  These are just a few sites that you can use to share your video. I hope you enjoyed the four part series on Animoto.  We will see you next week with another exciting topic.  Take care.


readmore »»  

Sunday, November 7, 2010

Creating Your Own Blog

Greetings,

Today I will be sharing with you how to create your own blog.  That's right you can publish your own material.  How many times have you attended a great training and you wanted to share the handouts or resources from the training with other teachers?  Well here is how you can do it.  To get started you can download my free training tutorial: How to Create Your Own Blog - Tutorial.  Simply click on the blue link above and chose save as.  You will want to save it to your desktop. The tutorial will review the following key concepts and ideas:

1. Learn how to create a blog by following the detailed pictures in the tutorial. 


2. Learn how to edit, proofread, add links, pictures and videos to your new blog.


3. Learn free tips, hints, tutorials and great resources to use in the classroom.


4. Includes step by step screen shot pictures of how to create a blog.


Hope you enjoy the free resource and keep me posted on how your blog is going.  See you next week. 

This hand out is being edited, and revised to reflect current changes in blogger and soon will be posted.
readmore »»  

Monday, November 1, 2010

Power Point Keyboard Shortcuts

Greetings,

Hope you are doing well this week.  Today I will be blogging about Power Point Tips and Hints.  One of the main hints and tips I will be discussing has to do with shortcuts.  Power Point 2003, 2007 and 2010 shortcuts are enabled when you use the Control button, which is located on the bottom right and left side of your keyboard. 

You will see a key that says Ctrl.  You will get many choices when you hold down the the Ctrl button and a letter.  Listed below are a few keyboard shortcuts you can use in Power Point.  Also listed below those commands are keyboard shortcuts used with ALT.  The ALT button is located on each side of your space bar.  Simply click on the picture below to download the shorcuts document.


Hopefully you will try these shortcuts and they will help you out while using Power Point.  If you would like more shortcuts please google the following in quotes "Power Point Keyboard Shortcuts".  See you next week with another exciting topic.
readmore »»  

Sunday, July 18, 2010

What is the Hat?

Greetings,

Today, I will be blogging about the Hat. The Hat is a random number/name generator you can use with your students. This application makes sure each person is randomly drawn equally. What's neat about this application is once you download it, you do not need to be connected to the internet.

One of the great features of this application are the fun special effects. The generator will make a toggle noise and a drum beat noise as the names are being shuffled and selected. This tool has given me another option to use, besides my traditional popsicle sticks in a cup. The popsicle sticks in a cup still works, except this generator has sound effects and is very visual. This makes it more exciting for the students.

To download this free and fun tool you can visit the following web site: http://www.harmonyhollow.net/hat.shtml
Here is what it looks like after you have downloaded it.

The fist thing you want to do is input the students names manually.


Once you select the Add Names Manually button, you will see the following window screen. You will need to type in your students name to add them to your list.

After you have all the names of your students in your class. You have two choices.

1. You can shuffle the names and the names will jump around from top to bottom to different position. You can either chose the name on the very top of the list or the bottom of the list. Then you can chose to delete the name.

2. You can chose to draw the names randomly out of the Magic Hat. The student will see his or her name appear on the middle part of the hat.

I personally like using the Magic Hat, that way the students are selected randomly to answer questions when I am presenting a lesson to the students. The names can only be chosen one time, so it is a true random sample.


Once you have drawn all the names of the students, you will see an indicator that says all the names have been drawn out. Then you can reshuffle, and continue to draw out the same names randomly.


If you have more classes you can chose to delete the names, clear the list or import the names into the generator.


You can also go into the options setting and change the interface or sound effects if you would like.


I hope you enjoy this fun and useful tool. I know your students will enjoy it. Remember download it and play with it, and you will be ready for your students when you need to ask questions to your students randomly. Hope his helps you out. See you next week.

readmore »»  

Sunday, July 11, 2010

What is Cool Timer?

Greetings,

Hopefully you had a great Fourth of July spending time with family and friends. This week I am sharing with you a timer you can download to use as a stopwatch or a count down timer with your students. All you need to do is visit the following site to download it for free: www.harmonyhollow.net/cool_timer.shtml

Once you download it you will not need an internet connection to run the program. Here is a screen shot of what it looks like, once you have downloaded it.

Your students will enjoy watching the countdown timer when they are in working in small groups, or independent practice. After you have downloaded the program, you can choose different built in alarm sounds to sound off when the time expires. You can even personalize the timer by having a short message scroll across the screen.


Another feature on this free timer is you can change the colors of the digits, buttons, and backgrounds to match your needs.

You and your students will enjoy all these unique features on this free timer. Hope you enjoy this tool. I would recommend you downloading this program to your home computer so you can play with it. Once you have learned all the different features I mentioned above, you will be ready to download it your computer at school.

Next week I will be sharing with you a fun random number generator you can use with your students to make sure they are picked randomly when you ask them questions. Yes, you can even type their name in the random generator to personalize it. See you next week.

readmore »»  

Sunday, May 16, 2010

What is Scribd and SlideShare?

Greetings,

Today I am excited to share with you Scribd.com and SlideShare.com in greater details. These are both web sites where you can download or share valuable resources. Ok, let's get started with Scribd.com. If you click on the picture below, it will take you to the website.


Check out Scribd 101
or you can watch the video below.


Remember, if you are interested in creating your own blog, and publishing your own blog, it is as easy as clicking on this link below to get the instructions. http://mikejmoran.typepad.com/visual_media/2009/11/creating-a-blog-using-blogger.html or you can click on this link below to see the document http://www.scribd.com/doc/22339943/Creating-a-Blog-in-Blogger If you want to download the power point or PDF then you can become a member of http://www.scribd.com/ for free and download all types of free informational documents. You can post any online document to share with the community. You can also charge for people to download your document and you keep 80% of profit.

Now we are ready to talk about SlideShare. Slideshare is a web site where you can also download free resources.
If you click on the picture below, it will take you to SlideShare.


Check out SlideShare 101
or you can watch the video below.


Stay tuned for next week. I will be sharing with you how to download YouTube videos for your next presentation. Videos are always useful and helpful in getting your point across to your audience. See you next week.
readmore »»  

Sunday, February 28, 2010

How to Create a Podcast or Vodcast Part 2 of 3

Hello,
Today I will be covering the following steps:

3. Installing Audio Software to Record Your Podcast
4. Using Audio Software to Record Your Podcast

So, let's get started with installing the audio software.

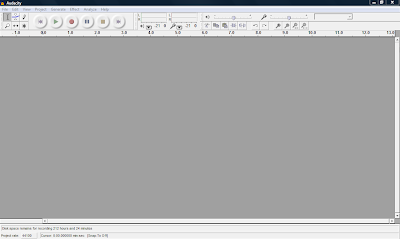
3. Installing Audio Software to Record Your Podcast: You want to use the best possible free software to edit and prepare your podcast. The one I recommend is Audacity. It's free and a very good sound editor. It can be found by clicking on the picture above. Once you go to the site you want to download Audacity 1.2.6 Once you get to the site you will want to choose Audacity 1.2.6 installer and if the download does not begin, choose the option direct link Save the file to your desktop. When you are using the software in Audacity you will need to convert your sound files to an Mp3 and you will need to download the LAME encoder by going to LAME Mp3 Encoder Once you visit the site, you will need to choose the operating system you are using, then click on the LAME download page Toward the bottom of the page you will see the following picture. Click on the appropriate link on the site, and save it to your desktop. Next, you will go to your desktop and double click on the icon and it will ask you to run it, click run and follow the instructions. You will want to remember where you saved it, usually it will be in your Program files menu. Next, double click on the audacity icon on your desktop and you will see the following:

Open Audacity and click on Edit -> Preferences -> File Formats Now this is what you will see. Click on Find Library and follow the instructions. (Here is where you want to find the LAME Mp3 Encoder file, remember it is under Program Files)

4. Using Audio Software to Record Your Podcast: Once you have your software and the Lame Mp3 encoder is installed you are ready to test your microphone. You can either use a headset with a microphone or you can use a microphone and your computer speakers. Plug in your microphone or headset. The microphone is usually the red jack and the headphones is usually the black jack. Go to Start -> Control Panel and double click on Sounds and Audio Devices. Next, click on the Voice tab and click the Test Hardware button. Follow the instructions to test your microphone. For additional tips on settings to make your recordings great visit the following site Great Tips on Recording When you are in Audacity make sure "Microphone" is selected as the recording source in the drop-down menu on the mixer toolbar.

Go to Edit -> Preferences -> On the Audio I/O tab make sure your sound card is selected as the device for playback and recording. In the Channels drop-down box under Recording, choose 1 (Mono). You can use stereo if you want but it will make your file larger and you want to try and keep it as small as possible. Under the Quality tab make sure you choose 44,100Hz as the Default Sample Rate and 16-bit as the Default Sample Format. Under the File Formats tab make sure you choose WAV (Microsoft 16 bit PCM) as the Uncompressed Export Format.

Now you are ready to record. Check on the microphone Meter toolbar in Audacity and you should see a red level indicator moving when you start recording. You can talk into the microphone and make adjustments to the volume until it looks like the picture below.


Now, your almost ready to record. Down below in the picture you will see the featured buttons to start your recording.


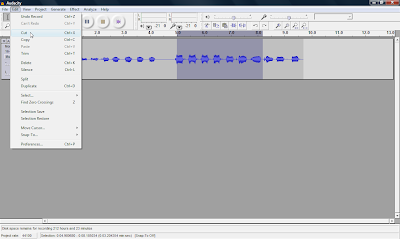
Simply push the Record button and you can start talking. When your done recording press the yellow square button to Stop the recording. If you want to edit your file, where you want to cut out parts of your recording or delete parts. You simply edit out parts by clicking and dragging to highlight the part you want to remove. Select Edit and choose either Cut or Delete. The part you want to edit will turn a grey shaded color. If you want to keep only one section of a recording, highlight that section and select Trim from the Edit menu. Take a look at the picture down below and you will see how to edit your clip.

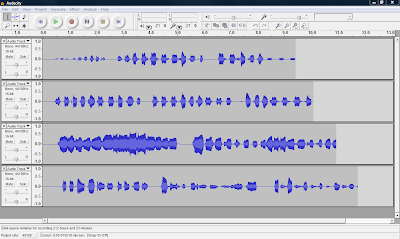
You can also record many multiple tracks to add to your podcast, which is one of the many features you can't do with movie maker 2.Ok, next week I will be talking abou the final steps in your podcast, step 5. Turning your Podcast into a Vodcast and step 6. Publishing and Promoting. I will also be covering how to add music to your podcast and how to convert your WAV file to an MP3 so you can post online. See you next week.
readmore »»  

Sunday, February 14, 2010

Free Resources You Can Download and Use in Your Classroom!

Greetings Colleagues,

Today I am blogging about a Great web site where you can find free, and valuable resources that other teachers have created and posted. You can sign up and join the community for free. When you sign up, you can search for all types of Microsoft Word, Excel, and Power Point documents, as well as pdf's. You will find many forms on classroom management, behavioral reward systems and behavioral contracts. I personally have searched the site for many useful documents that I have shared with other teachers. Just click on the picture to the left of this post to get started. Here is a list of 10 additional resources you will find on the site:

1. Beginning Teacher & Professional Development
2. Teaching Practices
3. Classroom Management
4. Managing Student Centers
5. Homework Ideas
6. Writing Ideas
7. Seasonal and Holiday Ideas
8. Science, Social Studies, Math, Reading, Language Arts Ideas
9. Technology Ideas
10. Visual and Performing Arts Ideas

Hope you enjoy the site. This is probably one of the most comprehensive collections of helpful documents I have found. When you get a chance, sign up for a free account and search for many ideas that you can use in your classroom. Hope this helps. Next week I will be blogging about podcasting and vodcasting. See you next week.


readmore »»  

Sunday, November 22, 2009

Power Point Resources - Free!


Greetings:

Today, I am sharing a wonderful web site that has hundreds of pre-made power points you can use with your students. You can also download them to your computer or a flash drive/jump drive or a portable hard drive. Here is the web site. http://www.pppst.com/

If you are interested in creating your own blog, it is as easy as clicking on this link below to get the instructions. http://mikejmoran.typepad.com/visual_media/2009/11/creating-a-blog-using-blogger.html or you can click on this link below to see the document http://www.scribd.com/doc/22339943/Creating-a-Blog-in-Blogger If you want to download the power point or PDF then you can become a member of http://www.scribd.com/ for free and download all types of free informational documents. You can post any online document to share with the community. You can also charge for people to download your document and you keep 80% of profit. Happy exploring, and we hope you will enjoy the web sites. More valuable resources to come in the future, so stay tuned.
readmore »»  

Wednesday, July 16, 2008

Wordpress Version 2.6 Released !!

Wordpress 2.6

Download link : wordpress2.6.zip

FEATURES

WordPress 2.6 may not be due until August 2008, but already I’ve managed to compile a list of features and enhancements that we’ll likely be seeing in this next major WordPress release. (I’ll continue to update this post as we approach the release date.)

  • Admin SSL support — The WordPress 2.6 admin should be able to be visited via either HTTP (normal connection) or HTTPS (encrypted connection), with the option to make admin HTTPS mandatory.
  • Remote publishing disabled by default — Having the main avenue of attack for WordPress blogs be disabled by default will be great for WordPress security.
  • Plugin Auto-Installation — In WordPress 2.5, you were able to upgrade plugins automatically; in WordPress 2.6, you may have similar functionality for new installations.
  • WordPress Auto-Upgrade — There’s been some early progress on incorporating auto-upgrade for WordPress itself into version 2.6.
  • Theme preview — Theme preview functionality would allow you to see what a new theme would look like on your blog before you activate it.
  • Theme paging — For those of you with a ton of WordPress themes (more than 15), you’ll be able to page through them in the administration. This should be especially useful for WordPress MU blogs that have large theme collections.
  • Ability to move wp-config.php — In WordPress 2.6, you’ll be able to move wp-config.php one directory level below the public root. Perhaps this could also allow multiple WordPress installations to share the same config file.
  • Google Gears support — Now integrated into the WordPress trunk (current working version), this feature will allow Google Gears users to experience a faster admin interface, and possibly manage their WordPress blogs while offline.
  • Identicons — In WordPress 2.6 you’ll have the ability to select a default Gravatar for those who don’t have one.
  • Post Revisions — Wiki-style revisions management for blog posts: a cool new power-feature, just announced on the WordPress Development Updates blog.
  • Shift-Click Checkbox Selection — In WordPress 2.6, you should be able to select a range of checkboxes in the category, comment, tag, post, page, and media administration sections by checking the “start” checkbox, holding the Shift key, and then checking the “end” checkbox… Gmail style.
  • Post Word Count — A WordPress.com feature that might be making its way into WordPress 2.6.
  • “Press This” Bookmarklet — The bookmarklet (which existed in WordPress 2.3 and prior but was removed in WordPress 2.5) has returned, new and improved.
readmore »»  

Monday, May 26, 2008

Download the new version of Wordpress !!

WordPress 2.5.1

The new version of wordpress is available now and ready for download !!


Features :

With famous 5-minute installation, setting up WordPress for the first time is simple. This new version have a handy guide to see you through the installation process. If you're upgrading your existing installation, version 2.5.1 have a guide for that, too. And should you run into any trouble along the way, their support forums are a great resource, where seasoned WordPress experts volunteer their time to help you get the most out of your blog.

Previous Version :
2.3 zip tar.gz md5
2.3.1 zip tar.gz md5
2.3.2 zip tar.gz md5
2.3.3 zip tar.gz md5
2.5 zip tar.gz md5


readmore »»