Showing posts with label edit. Show all posts

Sunday, March 20, 2011

How to Promote Your Animoto Video: Part 4 of 4

Greetings,

I hope you had a great Spring Break 2011.  Today I am sharing with you how to promote your video using the animoto features. I will also be sharing with you additional video hosting sites you may want to use. Alright let's get started on how to promote your animoto video.

As you can see in the picture below, you want to click on your My Videos tab at the top left of the screen and it will take you to your videos page.  You will need to click on the Green Actions button and you will see the following choices listed in the picture below.


 Once you click on the Download button you will be taken to the following screen below.  Now you are ready to save your video to your computer.
 Your video will be saved as a MPEG movie that can be played using Quicktime or any type of software that allows you to play MPEG files.  Choose Save and select a a location you want to save it to.


 You can also choose to share your video.  Look at the picture below and select the Share option.

 After you click Share, you will see the following screen.  This will give you the choice to post your video to many video sharing web sites such as Facebook, MySpace, Twitter, Blogger and many more.  You can also choose to share your video link via Email.

 You can also chose to Export your video to additional video sharing sites.


Down below you will see two video sharing options that you can select from to share your video.


 You can also post your video in your blog or another web site by choosing the Embed option.


 To embed the video, you will need to copy and paste the code into your site or blog that accepts HTML
.

Other ways to promote your video include posting to the following video hosting sites: http://www.teachertube.com/, http://www.schooltube.com/, http://www.video.google.com/, http://video.yahoo.com/, http://www.metacafe.com/  These are just a few sites that you can use to share your video. I hope you enjoyed the four part series on Animoto.  We will see you next week with another exciting topic.  Take care.


readmore »»  

Sunday, November 28, 2010

What is Google Docs?

Greetings,

Hope you had a great Thanksgiving Holiday this past week.  Today I am blogging about Google Docs.  According to Wikipedia, Google Docs has been around for since 2005, but was made available to the public in 2007.  If you are not using google docs, you are probably curious about all the buzz on this free application.

This application allows you to create ,edit and share documents, spreadsheets, presentations, forms, surveys and drawings.  It works with Microsoft Office products without requiring the user to have the program loaded onto their computer.  You can also upload your own documents to store online. 

The best way to tell you about this application is through videos.  Listed below are a collection of links that will educate you more on how you can use this application.  The 4 links below will show you videos from Youtube.  If you are unable to view these videos from your school.  You can always check them out at home.

1. Google Docs in Plain English (3 minute video) - If blocked, click here.


2. Teachers and Principals talk about Google Docs (4 minute video) - If blocked, click here.

3. Google Docs: A Love Letter (2 minute video) - If blocked, click here.


4. Learn More About Google Docs (step by step video tutorials)

To get started with this application, you can try it for free by visiting: http://www.docs.google.com/demo/ 
To start using Google Docs visit: http://www.docs.google.com/

Hope you enjoy the videos and tutorials above.  Remember, you want to spend time playing with the different applications that google docs has to offer.  I will see you next week with another topic.  Take care.
readmore »»  

Sunday, February 28, 2010

How to Create a Podcast or Vodcast Part 2 of 3

Hello,
Today I will be covering the following steps:

3. Installing Audio Software to Record Your Podcast
4. Using Audio Software to Record Your Podcast

So, let's get started with installing the audio software.

3. Installing Audio Software to Record Your Podcast: You want to use the best possible free software to edit and prepare your podcast. The one I recommend is Audacity. It's free and a very good sound editor. It can be found by clicking on the picture above. Once you go to the site you want to download Audacity 1.2.6 Once you get to the site you will want to choose Audacity 1.2.6 installer and if the download does not begin, choose the option direct link Save the file to your desktop. When you are using the software in Audacity you will need to convert your sound files to an Mp3 and you will need to download the LAME encoder by going to LAME Mp3 Encoder Once you visit the site, you will need to choose the operating system you are using, then click on the LAME download page Toward the bottom of the page you will see the following picture. Click on the appropriate link on the site, and save it to your desktop. Next, you will go to your desktop and double click on the icon and it will ask you to run it, click run and follow the instructions. You will want to remember where you saved it, usually it will be in your Program files menu. Next, double click on the audacity icon on your desktop and you will see the following:

Open Audacity and click on Edit -> Preferences -> File Formats Now this is what you will see. Click on Find Library and follow the instructions. (Here is where you want to find the LAME Mp3 Encoder file, remember it is under Program Files)

4. Using Audio Software to Record Your Podcast: Once you have your software and the Lame Mp3 encoder is installed you are ready to test your microphone. You can either use a headset with a microphone or you can use a microphone and your computer speakers. Plug in your microphone or headset. The microphone is usually the red jack and the headphones is usually the black jack. Go to Start -> Control Panel and double click on Sounds and Audio Devices. Next, click on the Voice tab and click the Test Hardware button. Follow the instructions to test your microphone. For additional tips on settings to make your recordings great visit the following site Great Tips on Recording When you are in Audacity make sure "Microphone" is selected as the recording source in the drop-down menu on the mixer toolbar.

Go to Edit -> Preferences -> On the Audio I/O tab make sure your sound card is selected as the device for playback and recording. In the Channels drop-down box under Recording, choose 1 (Mono). You can use stereo if you want but it will make your file larger and you want to try and keep it as small as possible. Under the Quality tab make sure you choose 44,100Hz as the Default Sample Rate and 16-bit as the Default Sample Format. Under the File Formats tab make sure you choose WAV (Microsoft 16 bit PCM) as the Uncompressed Export Format.

Now you are ready to record. Check on the microphone Meter toolbar in Audacity and you should see a red level indicator moving when you start recording. You can talk into the microphone and make adjustments to the volume until it looks like the picture below.


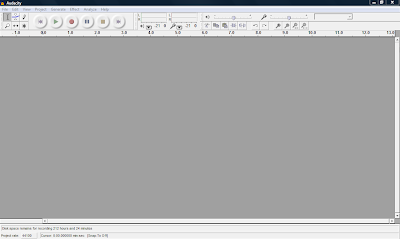
Now, your almost ready to record. Down below in the picture you will see the featured buttons to start your recording.


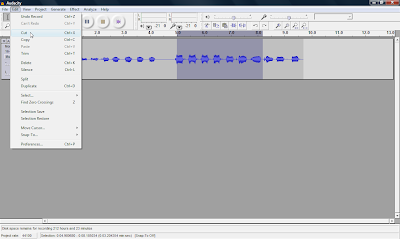
Simply push the Record button and you can start talking. When your done recording press the yellow square button to Stop the recording. If you want to edit your file, where you want to cut out parts of your recording or delete parts. You simply edit out parts by clicking and dragging to highlight the part you want to remove. Select Edit and choose either Cut or Delete. The part you want to edit will turn a grey shaded color. If you want to keep only one section of a recording, highlight that section and select Trim from the Edit menu. Take a look at the picture down below and you will see how to edit your clip.

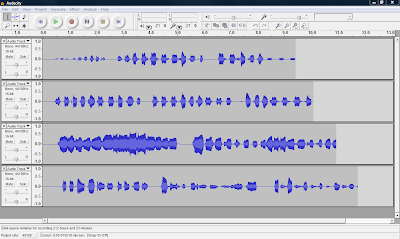
You can also record many multiple tracks to add to your podcast, which is one of the many features you can't do with movie maker 2.Ok, next week I will be talking abou the final steps in your podcast, step 5. Turning your Podcast into a Vodcast and step 6. Publishing and Promoting. I will also be covering how to add music to your podcast and how to convert your WAV file to an MP3 so you can post online. See you next week.
readmore »»  

Sunday, January 17, 2010

How to Take Pictures of Your Computer Screen Using MS Office 2003

Hello,

I hope you had a great week. Today I am sharing with you how to take screenshot pictures using MS Office 2003. Remember, all you have to do is push the print screen button on your keyboard. Whey you do this it will take a digital image or picture of your screen, like you see on the top. After you click it, you will not see any message that tells you that you have taken a picture and it is now ready to post. In fact you won’t notice anything different about your screen. When you click on the right side of the mouse chose the option paste and it will copy your picture in your office Document or PowerPoint. To edit the picture you have to double click fast on the left side of the mouse and you will see the Format Picture Box. If this does not work you will need to go to the very top of the screen and and chose the third option View. Then go down to the Toolbars option and check the option: picture and you will see a Picture tool bar appear on your screen like this Once you see the Picture option box, choose the little dog. It is the 4th Picture from the right side of the toolbox and choose the option Tight.

If you want to edit or crop the picture chose this icon Once you click on the little crop icon, you will see black lines around your picture. All you have to do is left click on the lines while holding the mouse and move the mouse to where you want to crop or cut the picture. Now if you double clicked on the picture you will see the following six tab options Color and Lines, Size, Layout, Picture, Text Box, and Web. You want to chose the third tab or the Layout option. When you chose this option you will see the following Next, you will click on the Tight option. It is located in the middle of the screen. Now you must decide if you want the picture aligned left, center, right or other. I would chose other and the when you click on the picture it will allow you to move it anywhere you want in your document. Once you chose the option you want click on the OK button on the bottom. You will see little white round dots around your picture (To see these white dots look very closely at the picture at the very top), which means you can now hold down the left side of the mouse to move it anywhere you want in your picture. You can also make the picture small or large by clicking on one of the dots and moving the mouse. Hope these directions help you out when you are practicing taking screen shot pictures and inserting them in your Documents or Power Points. We will see you next week.

readmore »»  

Sunday, January 10, 2010

How to Take Pictures of Your Computer Screen Using MS Office 2007

Hello fellow Colleagues,


Today I am blogging about a screen shot picture (a picture of your screen). Did you know that you can take pictures of your screen? Then you can crop (cut out the image you want out of the picture) and edit the picture and then you can put it in a Power Point or a word document.

This feature is the best kept secret for screen shot companies and they do not want you to know this. All it takes is one button and that one button is called the Print Screen button. It is located on your keyboard, right above the insert button. This button is also on the right side of the F12 button and left of the Scroll Lock button.

All you have to do is push the Print Scrn button. That's it, it is that easy. Then you open up MS Word or Power Point and you right click with your mouse and select the paste button and it will paste the screenshot in your document. To crop the picture you will need to double click on the screenshot with the left side of the mouse. Then you will left click on the crop feature button it looks like this picture. It is located on the right side of the ribbon. Once you have clicked on the button it will create lines around your picture in which you can left click to control how much you want to cut or edit out of the picture. Then you will look for the text wrapping button on the ribbon. It is usually a picture of a little Dog with horizontal lines around it. Next, left click on the text wrapping button and chose the Tight option. After you have done these steps you can now move it anwhere you would like it in your document. If you want to make the picture smaller or larger just left click on the picture and left click on the little circles around the picture and move the mouse. You can also copy and paste it into another document if you want.

Once you get the hang of taking screenshots you will be taking many screenshots of your screen. If you are looking for more information on this feature go to google and type "print screen in MS Word 2003 or 2007" Please keep in mind that these instructions are for MS Office 2007 version only. I hope to publish the MS Office 2003 version next week. Now, if you do not have MS Office 2007 I have posted a link where you can get it. Stay tuned and we will see you next week.
readmore »»  

Sunday, December 20, 2009

Tell the Whole World!

If a picture is worth a thousand words, then what is a talking picture worth? This week I am introducing a new web site that lets you turn any picture into a talking picture. That’s right, a regular picture into a talking picture. All you have to do is click on the picture to the left or click on the following link: http://www.blabberize.com/ Just like the picture says, it only takes 30 seconds. It's fast, easy and also fun to use. How would you like to use this tool to teach the students a concept or an idea from a talking picture?Your students or audience will love it. You can also put it in presentations or entertain your audience to make a point. Hope you have fun playing with it and we will see you next week.
readmore »»  

Sunday, November 29, 2009

Making Professional Movies with Digital Pictures/Videos for Free!

Today, I am going to share with you some valuable resources on how to make free movies or digital stories with your computer. There is a free software program the Microsoft has installed on all computers that have Windows and most people do not even know that this program is on their own computer. The name of this free program is called Windows Movie Maker (2).

So, what do you do with all those digital pictures and videos you have taken over the past holiday? You can turn them into a professional movie by using the program above. To find the program on your computers you click on Start -> Programs -> Accessories or you can find it in your Programs menu. Look for this picture to the left, when you are looking for it.
Now, I can go over the program and explain all the details of how to add pictures, add video, edit, clip, copy, cut, combine full-motion video, still images, narration, music, effects, titles, and transitions to create your own movies or you can learn it for free by viewing the following link through atomiclearning: http://www.atomiclearning.com/moviemaker2 When you click on the link you will watch professional videos on how to use the program step by step. You can watch from the comfort of your own home, then follow along step by step. Hope you enjoy the free tutorials (they are priceless). Here is another tutorial in which you can read step by step on how to use Windows Movie Maker (2): http://www.microsoft.com/windowsxp/using/moviemaker/default.mspx With this program you can also learn about Creating Digital Stories with Windows Movie Maker 2 Just click on the link above and it will take you to the University of Houston web site on Creating Digital Stories. Hope this helps and we will be sharing more and exciting and free info. in the future with you.
readmore »»