Showing posts with label presentations. Show all posts

Sunday, July 17, 2011

What is Cloud Computing?

Greetings,

I hope you are having a Great Summer!  I know it has been pretty Hot over here in the Dallas/Fort Worth Metroplex.  Today I will be sharing with you a new term that is becoming very popular in mainstream.  In fact on Yahoo, this term Cloud Computing was featured the second most popular topic last week. 

If you look at the diagram up above, you can see that as a society we are bombarded with technology from tablets, laptops, desk tops and smart phones.  What if we could have one central location online to store all of our files? Well there is a solution and it is called a cloud.  In a cloud we can store all types of files and access them from our many digital devices. 

You can now access your files from anywhere and from any computer on the internet by using a cloud. Online file storage has been around for many years and is now becoming available to the average person.  You will be hearing more informaton on cloud computing in the future.

Clouds are becoming easy to use and people are starting to upload their files to them. One of the Great features about clouds, is they allow you to share these files with your friends and colleagues.  Clouds also allow you to keep your files safe and secure. 

If you want to get your own cloud, one of the best recommended sites you want to try is dropbox.  This site allows you to hold up to 2GB of memory in their cloud.  You can register with them and get more space if you want for a nominal fee.  Simply click on the picture below to get started sharing your files in a cloud.


We hope you enjoyed this blog article.  We will see you next week with another new and exciting topic.  If you want to learn more technical details about cloud computing, you can click Here. Take care.
readmore »»  

Sunday, July 10, 2011

Have You Heard of Open Office?


Greetings,

I hope you had a Great Fourth of July Week.  This week I will be sharing with you a free open-source office software suite for Word Processing, Presentations, Spreadsheets, Graphics and Databases and More.  There are a lot of people who are not aware about this free software.

If you click on the picture above, it will take you to the site where you can download this free open sources office software package.  That's right for free!  This is a program that has similar functions as the Microsoft Office 2003 software applications such as (Word, PowerPoint, Excel and Access). 

There are free tutorials on the web site and on YouTube where you can learn how to use all of the free open-source office software programs.  The best thing about this free software is you can use it for any purpose you wish and that includes commercial and educational. 

You can also install it to as many computers as you like.  You can make as many copies and give them away to family, friends, students and employees.  If you are not using the MS Office 2010, 2007 or 2003 software applications, I encourage you to download Open Office. 

You will want to learn, practice, create projects and then teach others how to use it.  I hope you enjoy this free resource.  Don't forget, if you are currently learning how to use PowerPoint 2010, you can check out my free tutorials on YouTube.  Just search for the Complabteacher channel.  I will see you next week.  Take care.
readmore »»  

Sunday, November 28, 2010

What is Google Docs?

Greetings,

Hope you had a great Thanksgiving Holiday this past week.  Today I am blogging about Google Docs.  According to Wikipedia, Google Docs has been around for since 2005, but was made available to the public in 2007.  If you are not using google docs, you are probably curious about all the buzz on this free application.

This application allows you to create ,edit and share documents, spreadsheets, presentations, forms, surveys and drawings.  It works with Microsoft Office products without requiring the user to have the program loaded onto their computer.  You can also upload your own documents to store online. 

The best way to tell you about this application is through videos.  Listed below are a collection of links that will educate you more on how you can use this application.  The 4 links below will show you videos from Youtube.  If you are unable to view these videos from your school.  You can always check them out at home.

1. Google Docs in Plain English (3 minute video) - If blocked, click here.


2. Teachers and Principals talk about Google Docs (4 minute video) - If blocked, click here.

3. Google Docs: A Love Letter (2 minute video) - If blocked, click here.


4. Learn More About Google Docs (step by step video tutorials)

To get started with this application, you can try it for free by visiting: http://www.docs.google.com/demo/ 
To start using Google Docs visit: http://www.docs.google.com/

Hope you enjoy the videos and tutorials above.  Remember, you want to spend time playing with the different applications that google docs has to offer.  I will see you next week with another topic.  Take care.
readmore »»  

Sunday, October 24, 2010

What is a Pocket Projector?

Greetings,

Today I will be sharing with you one of the newest gadgets that is becoming very popular with people. I first heard about this projector last year. I have listed a review on this product that I would like to share with you.

This review was done by M. David Stone, a Lead Analyst for Printers, Scanners & Projectors. To read his review on the 3M Pocket Projector MPro150 visit the following site: http://www.pcmag.com/article2/0,2817,2361254,00.asp?tab=FullReview To find other reviews google the following information with quotes "The 3M Pocket Projector MPro150"

You can also visit 3M Web site which can be found by clicking on the picture below.


I will be planning on getting one of these gadgets soon. Hope this information helps you out. I will talk to you next week about another exciting topic in technology. Take care.
readmore »»  

Sunday, March 28, 2010

How to Find Free Microsoft Office Power Point, Word and Excel Templates


Greetings,

Today I am blogging about how to download thousands of free office templates from Microsoft Office. If you click on the picture above, it will take you to the Microsoft site where they post their free templates. Also if you create a template, you can upload it to their server and others will be able to download it as well. I am currently working on a (5 Year Planner) 2010 - 2015, 3 month planning calendar that I will be posting soon on the site. Stay tuned and I will let you know when I post it. It will be posted under academic year calendars. Hope this helps out. See you next week.

readmore »»  

Sunday, January 31, 2010

How to Turn any Room into a Presentation Room With Your Computer Part 2

Hello,

Hope you are all doing well. Today I will be blogging about part 2 on how to turn your room into a presentation room. That's right, I will be giving you my own 
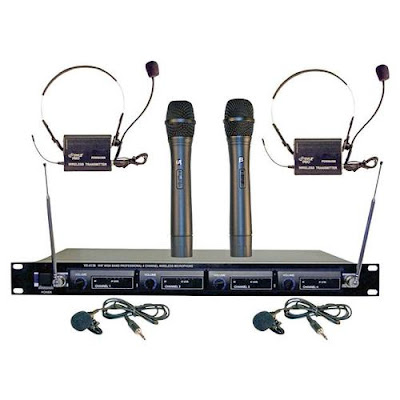
professional recipe, and also reveal the type of system I am currently using in my classroom. If you look at the picture to the left.  This is the wireless system I am using in the classroom.  This system requires no connection to your computer.

The students are amazed by it, especially when they get to talk on it, or give presentations. Just this past week, elementary students from first to fifth grade were able to hold the wireless microphone, while I used the lavaliere microphone clipped to my tie.

The students were so excited to hear their own voice over the speakers in my room. Several students were able to ask questions, read the daily objective, and give PowerPoint presentations while using the wireless microphones. I think they really cherished and enjoyed this experience.

The professional VHF wireless microphone comes with 4 wireless microphones. I have been using this system for the past 2 years and it is a pretty good system for students to use. Last year during the end of the school year party we pulled out all four microphones plus another corded one I had, and had a great Karaoke party in my room. The kids really enjoyed the experience to hear their voice amplified through the system. These are just a few uses you can use the system with.

This is a professional VHF wireless system from Pyle that comes with two handheld microphones, two belt pack transmitters that clip on to your belt with lavaliere and headset microphones, power on/standby/off switch, four 9 volt batteries and ¼ audio cable included, RF indicators, AF level meters, individual volume controls, ¼” individual and mixed output, frequency range: VHF 160-270MHz, operation range: up to 240 ft., power supply: 110/220 V Dimensions: 16.5” x 8.2” x 1.8”
Model Number: Pyle Pro PDWM4300


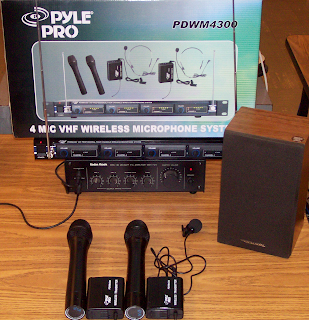
When you look at the picture on the left, you will see the VHF wireless system I am currently using with my students. I also use a corded microphone (not pictured) that you can buy separate. (I use the Memorex brand) I have the headsets put up in my room.

We get the headsets out on special occasions. I have a MPA-30 20 Watt PA amplifier 120V/12V by Radio Shack, which is connected to a little speaker that I place in the center of the room. (By the way, the amplifier, and the speaker were given to me by a close friend of mine, who found out I was using professional microphones in my room.

You see, when you are doing great things in your classroom, people tend to want to help you out!) There are several 20 watt PA amplifiers you can find online, just google them. As I was writing this post I saw some on Ebay, for as little as $10. Also you will need to get some small speakers (not computer speakers) to plug into the back of the amplifier. Once you connect all these together you are ready to use it.

By the way if you go to this site you can see the manufacturer’s manual: http://www.pyleaudio.com/manuals/PDWM4300.pdf The manual will give you even more detail about the system. At the time I was blogging, this professional VHF wireless system retails for about $267. You can check it out from the Manufacturers web site at by clicking on Here. As I said you can build this system for under $200. When I purchased my system I paid around $110.

 Unfortunately the price has gone up. If you are interested in the VHF wireless system, check out the ones below to see if these are in your budget. Ok, we will see you next week, coming up in a few weeks you will hear about the podcasting and vodcasting classes I am teaching with a colleague of mine. Talk to you later.
readmore »»  

Sunday, January 24, 2010

How to Turn any Room into a Presentation Room with Your Computer Part 1


Hello,

Today I am blogging about how to set up a microphone PA system in your classroom. You can turn any room into a presentation room by using your computer, and your computer speakers.

 I think teachers should create a Great Experience for their students, and having a microphone, and speakers in their room does that. You can have students give presentations, and they can hear their voice amplified over your speakers. You can teach your students interview skills, and presentations skills. You can also teach them how to defend proposal, and premises in front of the class.

From my experience of visiting different elementary schools, I am finding about less than 1% of the teachers use microphones in their classrooms. So this can be a great way to help your students in having an unforgettable experience that they will never forget, while teaching them presentation skills at a young age.

It is as easy as connecting a microphone to the back of your computer through your sound card. You want to make sure you have computer speakers connected to your computer, so the sound can come through them. As you can see in the picture, you connect the round metal tip to the back of your sound card. At the end of the cord, it is usually color coded to match the color of your jack input in your soundcard. If it is not, then you are looking for an imprint or picture of a microphone on the back of your sound card.

Your other options are to buy a USB Microphone and just plug in the Microphone into a USB port. Many USB Microphones come with software you have to install before you connect the microphone to the computer. Once you do this, then all you have to do is to go into your sound and audio devices in your settings on your computer to turn on the microphone. To do this you have to left click on your green start button on the bottom left side of your computer screen. There are two views you could be using on your computer. (To enlarge the pictures you need to rapidly double click the pictures with the left side of the mouse)

The first view is the classic start menu and the second view is the new start menu. Let’s go over the first one, the classic start menu. Older computers have this menu and it looks like this Click on control panel and you are looking for an icon that says Sounds and Audio Devices Once you find it, rapidly double click with the left side of the mouse and you will see a menu like this

The second view is the newest view for Windows XP, Vista, and Windows 7. Left click on the green start button on the bottom left of your screen. You are now looking for this button on the right side of the start menu. You will need to left click on the control panel button. Next, you will see this menu You will need to rapidly double click with the left side of the mouse on the Sounds, Speech and Audio Devices. This is the next menu you will see after you have opened up your Sounds and Audio Devices Options. You will be on the sounds tab button. You can place a check by the Place volume icon in the taskbar and then you want to click the button below that Advanced and you will see a menu like this You will want to uncheck the box that says Mute under the button that says Microphone, so you can hear sound coming out of your microphone. Do not worry about the other checks. You can close the Playback Control box and close the Sounds and Audio Devices Menu. You should now be able to talk with your microphone and hear the voice sounds projecting through your computer speakers.

Hope this helps if you have any other challenges while setting this up, please visit this following resource site: http://atr.k12.hi.us/tutorials/tutorials/sound/soundpt1.htm#one We will see you next week with part 2 on how to create set up a four professional wireless microphone system in your room for under $200. That's right I will be giving you all the details of where I purchased my professional wireless microphone system fron under $100. See you next week!
readmore »»  

Sunday, January 17, 2010

How to Take Pictures of Your Computer Screen Using MS Office 2003

Hello,

I hope you had a great week. Today I am sharing with you how to take screenshot pictures using MS Office 2003. Remember, all you have to do is push the print screen button on your keyboard. Whey you do this it will take a digital image or picture of your screen, like you see on the top. After you click it, you will not see any message that tells you that you have taken a picture and it is now ready to post. In fact you won’t notice anything different about your screen. When you click on the right side of the mouse chose the option paste and it will copy your picture in your office Document or PowerPoint. To edit the picture you have to double click fast on the left side of the mouse and you will see the Format Picture Box. If this does not work you will need to go to the very top of the screen and and chose the third option View. Then go down to the Toolbars option and check the option: picture and you will see a Picture tool bar appear on your screen like this Once you see the Picture option box, choose the little dog. It is the 4th Picture from the right side of the toolbox and choose the option Tight.

If you want to edit or crop the picture chose this icon Once you click on the little crop icon, you will see black lines around your picture. All you have to do is left click on the lines while holding the mouse and move the mouse to where you want to crop or cut the picture. Now if you double clicked on the picture you will see the following six tab options Color and Lines, Size, Layout, Picture, Text Box, and Web. You want to chose the third tab or the Layout option. When you chose this option you will see the following Next, you will click on the Tight option. It is located in the middle of the screen. Now you must decide if you want the picture aligned left, center, right or other. I would chose other and the when you click on the picture it will allow you to move it anywhere you want in your document. Once you chose the option you want click on the OK button on the bottom. You will see little white round dots around your picture (To see these white dots look very closely at the picture at the very top), which means you can now hold down the left side of the mouse to move it anywhere you want in your picture. You can also make the picture small or large by clicking on one of the dots and moving the mouse. Hope these directions help you out when you are practicing taking screen shot pictures and inserting them in your Documents or Power Points. We will see you next week.

readmore »»  

Sunday, December 27, 2009

$30,000,000 Deal for Sharing Video!


Greetings,

I recently visited with a colleague of mine this past week, and it gave me an idea to blog about today’s topic. Most people have already heard about Youtube. You know where you can create a free account and post your own videos online. Here is a real life rags to riches story. Recently an unknown film producer produced a short four minute video costing around $300, in which robots where attacking a city and Hollywood found it. There soon was a bidding war for the video and finally Sam Raimi, the producer of "Spiderman" offered him a $30 million dollar deal. That’s right a 30 million dollar deal to collaborate with him to produce a new movie with robots of the future blowing up a city. If you the video above is not working, here is the link Panic Attack! or you can click on the picture above. So far this video has received over 5,500,000 hits. To learn more about the video, yahoo has posted a blog discussing more details of the future Hollywood blockbuster. Just visit http://movies.yahoo.com/feature/buzzlog-uruguay-to-hollywood.html So what kind of effect does this have on teachers?


If you have a video creation in which you are teaching a concept or idea you can post it on either http://www.youtube.com/ or http://www.teachertube.com/ Teachertube is a video sharing web site, in which teachers post their collection of videos. When you go to presentations for staff professional development, you know how the presenter usually has a funny video clip stressing an important point in his or her presentation. This is the site where most of those clips are coming from. So check out these new video sharing web sites and yes, you too can produce your own videos to share with the whole world.

Stay tune to next years blogs. I will be teaching you how to download videos from Youtube directly to your computer that you can use in presentations. I will also be reviewing the new flip camera by flip and sharing with you my exciting video about the Wintery Blizzard in West Central Texas I encountered, where I was stranded on the highway for 9 hours with thousands of other people. I will be showing you how to edit, crop pictures and take screen shots of your work in MS Word and soon I will be going step by step how to set up your own microphone in your classroom. I can't forget twitter, how to host your own web cast, and how to create your own podcast, as well as more picture sharing web sites. We have an exciting new year coming so stay tuned and we will see you next year. A lot of school districts have banned Youtube so I have posted the video here.
readmore »»