Showing posts with label create free videos. Show all posts

Sunday, July 24, 2011

How Do You Make A Stop Motion Digital Animation Movie in PowerPoint? Introduction

Greetings,


We hope you are doing well.  We have been baking today in the Dallas /Fort Worth Metroplex.  I believe we had a high of 106 degrees.  Wow!  That's Hot!

Here is the question of the week, in which we have been receiving numerous requests on.  Can you really create a Stop Motion Digital Animation Movie in PowerPoint?  The answer is Yes!

First of all let me share with you that we will go into greater detail on how to start producing your movie next week.  The first thing we need to discuss is the materials you will need for your movie project.  Here they are.

1. A Digital Camera

2. Computer

3. PowerPoint 2010, 2007 or 2003 Software

4. Soft clay

5. Materials and props

That's it, just 5 materials for your movie project.  If you have not seen my movie the Bumpy Ride with Music on YouTube, you can view it down below and it will give you more ideas for more materials to use in your own movie.  Remember you can get as creative as you want.  It's your movie.


Next week, we will go into how to use PowerPoint to create your own Stop Motion Digital Animation Movie.  If you want to get a head start you can view my three week tutorial I wrote on Sept. 12. 2010, Teaching with Claymation: Part 1 of 3

We will be following some of these principles talked about in the Teaching with Claymation tutorials.  So your homework is to collect all the materials listed above and we will start showing you in greater detail how to Make a Stop Motion Digital Animation Movie using PowerPoint next week.  Take care.


readmore »»  

Sunday, June 12, 2011

Can You Download Great Videos From YouTube?


Greetings,

Can you really download free YouTube videos for your own personal entertainment using free software? I found a free software program you can download that allows you to grab the web site of a YouTube video and paste it into the free YouTube Downloader.

To learn more about this free program simply click on the picture above.  To download this program, click here.  After you have downloaded it, follow these simple instructions on how to save a YouTube video by clicking here.  

The only issue you will encounter is when you install the program.  Make sure you read the instructions carefully and uncheck the items you do not want. Otherwise, you will accidentally download a search toolbar and other unwanted programs.

I hope you enjoy this free program and have fun downloading your YouTube Videos.  I will see you next week with another exciting topic.
readmore »»  

Sunday, June 5, 2011

Have You Started Broadcasting on YouTube?

Greetings,

Today I am so excited to let you know that I am now on YouTube. That’s right I have created my own broadcasts  or TV shows on YouTube. You can share ideas, how to videos and resources for free on YouTube.  To check out my channel, you can click on the picture above or simply click here.  As of today, I have posted 13 videos with more to come over the summer.

You can start your own broadcast with a digital camera and using Windows Movie Maker.  You can check out the blog article I wrote November 29, 2009 for the free online tutorial.  If you have the new Windows Live Movie Maker that comes with Windows 7, then click here for a free video tutorial or click on the video below.


Once you have viewed that tutorial and tried a few of the exercises, you can visit this second video tutorial by clicking here or clicking on the video below.


For more video tutorials click here.

To start your own YouTube channel simply visit: http://www.youtube.com/   and follow the instructions on how to start your own YouTube account. If you are an elementary, middle school or high school student, make sure you get your parents permission before starting your own YouTube channel.

Students remember never to give out any personal information online such as your real name, city, address, age or school. I hope you enjoy my videos I have posted on YouTube. I will be sharing more videos in the future.

If you want to start downloading any YouTube videos, make sure you check out my article I wrote on May 3, 2010.  This article will give you all the details you need to start you own library of videos.  We will see you next week with another exciting topic.  Take care.
readmore »»  

Sunday, March 20, 2011

How to Promote Your Animoto Video: Part 4 of 4

Greetings,

I hope you had a great Spring Break 2011.  Today I am sharing with you how to promote your video using the animoto features. I will also be sharing with you additional video hosting sites you may want to use. Alright let's get started on how to promote your animoto video.

As you can see in the picture below, you want to click on your My Videos tab at the top left of the screen and it will take you to your videos page.  You will need to click on the Green Actions button and you will see the following choices listed in the picture below.


 Once you click on the Download button you will be taken to the following screen below.  Now you are ready to save your video to your computer.
 Your video will be saved as a MPEG movie that can be played using Quicktime or any type of software that allows you to play MPEG files.  Choose Save and select a a location you want to save it to.


 You can also choose to share your video.  Look at the picture below and select the Share option.

 After you click Share, you will see the following screen.  This will give you the choice to post your video to many video sharing web sites such as Facebook, MySpace, Twitter, Blogger and many more.  You can also choose to share your video link via Email.

 You can also chose to Export your video to additional video sharing sites.


Down below you will see two video sharing options that you can select from to share your video.


 You can also post your video in your blog or another web site by choosing the Embed option.


 To embed the video, you will need to copy and paste the code into your site or blog that accepts HTML
.

Other ways to promote your video include posting to the following video hosting sites: http://www.teachertube.com/, http://www.schooltube.com/, http://www.video.google.com/, http://video.yahoo.com/, http://www.metacafe.com/  These are just a few sites that you can use to share your video. I hope you enjoyed the four part series on Animoto.  We will see you next week with another exciting topic.  Take care.


readmore »»  

Saturday, March 12, 2011

How to Create and Produce an Amimoto Video: Part 3 of 4

Greetings,

Hope you are having a great Spring Break.  Today I will be sharing with you the video I created in animoto.  I will also be sharing with you the various steps in creating the video.  So let's get started.  When going through this tutorial I would recommend pulling up this blog article side by side on your computer screen as you follow the various steps.  You can also print it out and follow along if you choose to.

The first thing you want to do is pick a video style.  The video style will add a theme to your slides and will have an impact on the movement of your slides.  You can also preview your slides to see the various themes that will be in your video.


After you have selected your theme, you will need to upload or add pictures or videos you want to put into your movie.  You will need to select Upload to add your pictures to your project from your computer.


In the picture below you will see the pictures I selected to use in my video.  Once the pictures are ready you will have several options to select from.  You will be able to Add More Pictures, Add Text, Spotlight, Rotate the Pictures, Duplicate, Delete and Shuffle the Pictures.  After you are satisfied with your choices, click on the Done button.


If you choose not to use your pictures on your computer, animoto gives you the option to use their pictures and videos in your video.  Listed below are the various themed pictures that animoto will allow you to use in your video.


Here are the video themes you can add to your video if you wish.


You can even choose to add pictures form a photo hosting web site from the following accounts listed below.


Once you have assembled the pictures the way you want them and the order you want them to play, you will go to Step 2: Music.  Listed below you will see the second option with the plus sign and it is the Upload button.  This feature will allow you to add your own music from your own computer.  Animoto also has a range of music to choose from, if you want to use their music.


Listed below are the different types of genres of music you can choose from to add to your video.


After you have added the music you want, then you can move to Step 3: Customize your video.  You will be given the choice of Image Pacing, Video Length, Video Style and various other Options.  After you have selected your preferences, simply click on the blue Continue button.


Now you are ready to add your title to your video and description.  There is also a place to put your name as the Producer.  How cool is that?  When you are done with filling in this information, you are ready to create your video. Just click on Continue.


Now you will see the animoto production screen.  This process will go through the following stages: Processing, Composing and finally Producing.  For a 30 second vide, it may take anywhere from 3 - 5 minutes to go through the three stages of video production.  Remember the various stages are all done on the computer and automatically.

When your video is finally finished, you will see a screen like the one below.  You will have the option to re-mix up the images again to produce another movie if you wish.  You can also download it to your computer or share it using Facebook, Twitter, Youtube or even email it to all your family and friends. 


If you click on the My Videos tab on the top of the screen it will take you to where all your videos are stored.  You will also see Untitled Projects, these are projects that were not completed.  If you click on the Edit Project button you will be given several choices such as Edit, Create New Video, Rename and Delete.  If you chose to click on Delete, you will not be able to get the video or project back.


If I move the mouse over the light blue are under the title of my Video "Majestic Places of the World", it will show the following details about the video:

1. Length of the Video
2. The type of Style
3. The Description of the Video
4. The Number of Views
5. The Music you selected.


Here is my final 30 second video that I created with my pictures and the music I selected. Click on the play button to see it.

I hope you enjoyed the detailed tutorials with screen shots.  Next week I will be sharing with you Part 4: How to Promote your Video.  See you next week.  
readmore »»  

Sunday, March 6, 2011

How to Sign up for a Free Animoto Account: Part 2 of 4

Greetings,

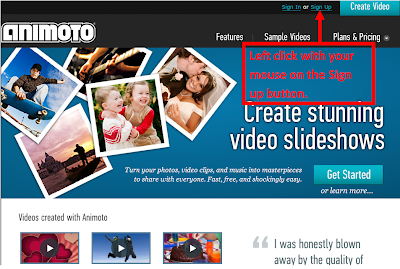
I hope you had a great weekend.  Today I am continuing my blog on Animoto on how to sign up for a free account.  To sign up for a free account simply go to http://www.animoto.com/  When you get to the web site you will see the following down below.  Follow the instructions in the red box.


Once you click on the blue Sign Up button it will take you to the following page below.


Simply choose the Free one on the far left hand side.  It is called the lite.  Once you click on the Try Now button it will take you to the following page below and you will need to fill out the information to register for a free account.


Once you complete the information, click on the blue Sign Up button and you will be able to log into Animoto.  You will also get a welcome email from Animoto giving your additional instructions on how to use the program.  You may want to review the terms of service and the privacy policy, but this is standard procedure.

Next week I will be discussing Part 3: How to Create a Video.  I hope you have a great week.  I will see you next week.  Take care.
readmore »»  

Sunday, February 27, 2011

What is Animoto? Part 1 of 4

Greetings,

I hope you are doing well this week.  Today I will be sharing with you a great web site where you can produce your own videos or slide shows by using pictures, videos and music for free.  The web site is called Animoto.  Simply click on the picture below, and it will take you to the web site.


Animoto is a web site that allows you to produce your own videos by using your own photos, video clips and music. Animoto will look at your photos, video clips and music, and put them into a mini video, like a 30 second movie trailer. Once the song or video is created, it will have its own unique design.

According to the Animoto web site, they state that no two videos are ever the same. This tutorial series will be a four part tutorial with pictures and details of the process to create your customizable video. This is how the tutorials will be broken down.

Week 1: Introduction to Animoto and Sample Civil Rights Video

Week 2: How to Sign up for a Free Account

Week 3: How to Create and Produce a Video

Week 4: How to Promote Your Video

Stay tuned for week 2 on how to sign up for a free account. I will see you next week.
readmore »»