Showing posts with label Tutorial. Show all posts

Tuesday, March 6, 2012

Dr. Fry's Second 100 Words

Greetings,

Today we are sharing with you the Dr. Fry's Second 100 Vocabulary Hi Frequency Vocabulary Sight Words.  You and your child will enjoy learning, practicing and reviewing Fry's Second 100 Words in this fun and colorful tutorial.

Once your child learns and memorizes these basic vocabulary sight words, they will read more fluently with greater comprehension. The second 100 words should be mastered by Second Grade.  We hope you enjoy these free resources.  See you next week.  Take care.


readmore »»  

Sunday, January 29, 2012

What Are Dolch Vocabulary Words? Part 2

Greetings,

We hope you are doing well.  We are excited to share with you more of our newest Dolch Vocabulary videos for First Grade and Second Grade.  If you do not know what the Dolch Vocabulary words are, these are the most common words that your child needs to know for reading.

Edward William Dolch, PhD. researched and compiled the list many years ago.  Many of these words need to be learned by sight and are easily recognized in books.  Students will see many of the words in the books they read.  Listed below are the recommended First Grade and Second Grade Vocabulary Sight Words.


We hope you enjoy these free video tutorials.  We will see you next week with another exciting topic.  Take care.


readmore »»  

Sunday, November 13, 2011

Free Counting on the Number Line Videos!


Greetings,

We  hope you are having a great week.  We have one more week until the busy Thanksgiving Holiday break.  This week we will be sharing with you our new Counting on the Number Line videos with Froggy the Frog.  The video above is a counting tutorial using a number line and Froggy the Frog. Watch Froggy the Frog as he jumps all over the number line.

This is a fun way to learn how to recognize where numbers fall on the number line.  Listed below are more of the Counting on the Number Line with Froggy the Frog videos.  These videos are great for anyone learning how to use the number line.  We hope you enjoy these free K - 2nd resources. 


Be sure to stay tuned to next week, we will be sharing with you more counting videos and activities with animals. Take care.
readmore »»  

Sunday, October 23, 2011

Counting to 10 with Colorful Cubes


Greetings,

We hope you are having a great weekend.  This week we will be sharing more elementary educational videos.  The video above is called "Counting to 10 with Cubes".  This video will assist you and your child in counting to 10 and help your child understand the relationship and patterns of numbers.  This video is for grades K - 2.

We hope you enjoy this colorful and wondeful video tutorial.  Coming soon we will be sharing with you fun counting and number activities that you and your child can interact with.  Stay tuned to more videos coming soon.  Take care.
readmore »»  

Sunday, August 7, 2011

How Do You Make A Stop Motion Digital Animation Movie in PowerPoint? Part 2 of 3


Greetings,

We hope you are having a great summer.  This is part 2 of the tutorial.  This is a pretty detailed hand out.  The hand out will review how to set up your PowerPoint background step by step.  It also will review how to set up your Special Effect TitlesTo get the free hand out simply click Here or on the picture above and you can download it as a PDF.

Next week we will finish the final tutorial.  We will review how to add the music to your movie and how to add rolling credits.  We will see you next week.  We hope everyone has a great week before heading back to school in a few weeks.  Take care.
readmore »»  

Wednesday, July 13, 2011

Easy guide for parents to monitor children while playing games

It is no secret that the content in the game often does not correspond with the children and the development period. Violence, nudity, violence, until the scene "adult" exposure-prone in children if the parents are not able to supervise and work around.

However, parents themselves may not be able to continue to accompany his son to play because the other busyness. What then then need to forbid children to play games to avoid this from happening? Own research shows children who play video games automatically train the fine motor skills, ability to recall, problem solving skills, ability to learn the language. And of course most importantly, children can feel happy about it.

Parents do not really worry too much, because we'll give you five tips that will make it easier for parents to supervise, control, or even the "censorship" of their children played games that can be done quickly and easily.


Communicate with Children

Good way is to let the child to supervise themselves. Parents can communicate with the child, what kind of game content has not been matched with themselves and the reason is so that children can learn to mature and do the "censorship" of the games he played himself. Parents themselves also have to tolerate the extent to which the game may be played or not.

All parents may not want their children to play games that have violent content, but that does not mean all games have violent content and then banned it? Give tolerance and understanding of violence such as what is allowed (eg fighting game) and what kind of violence should not be played (eg: full of mutilation).


Read Review about Your Child's Game is Played

Parents must be pro-active to get to know and learn more about the games played by their children. Being passive means that increase the risk of your child's exposure to inappropriate content in the game. Parents need to actively surfing the internet and dig as much information about the game being played by their children.

Parents can read the reviews of those games to get an overview about the types of games and content, then decide if the game is compatible with their child, or should do "censorship" against him. Jagat Review itself also reviews the latest games on the market.

Choose the Right Games Console

Parents are often confused to choose the right gaming console for his son because of the different variants of consoles available on the market. Each console has its own advantages and disadvantages, and often parents do not understand much about it. So what to do? Console what to choose?

Actually, parents can choose the console that suits their child's age. Some console games are designed to prefer the side and hence lots of fun games available are the games that put an element of fun and not the content of "heavy" and "mature" other. Parents can choose the Nintendo Wii or Nintendo DS for it. But that does not mean all games in the Nintendo Wii and Nintendo DS would fit with the kids. Wii and DS rather minimize the possibility of exposure to negative content. Both the console itself has a game with a variety of game genres and not everything is perfect with children. Following tips will help you select the game itself.


Maximize Video Sites for Getting the picture

If you read the review in writing can not provide a clear picture of the types of games and game content, the parents can switch to using free video sites like YouTube to get a more precise picture. Such sites usually provide pieces of videos taken directly from the game itself, so that parents can learn about the form of games and content available therein. It's easy, simply by adding the words "Gameplay" behind the name of the game title in the search field is available. Example: "Resident Evil 5 Gameplay", "Klonoa 2 Gameplay", or "Grand Theft Auto Gameplay" and so on according to the title game being played your child.


Visit ESRB (Entertainment Software Rating Board)

The ESRB is an independent agency that provides age ratings on games that are currently circulating in the world than any console. ESRB can be a valid and reliable reference for information related to the game that your child is being played. ESRB game itself divides into six age categories C (Children / Children), E (Everyone / Everyone), E 10 + (Everyone or aged over 10 years), T (Teen / Youth), Mature (Adult / 18 +), and Adult Only (Games that have an explicit pornographic content). Usually parents will find these letters on the front page cover of the game.

One thing worth noting, because in Indonesia most of the games in circulation is pirated or copied, it is not surprising cover of the game and the ESRB rating is also "modified" in such a way. Therefore, in general you'll find in all the games that circulate here is the rating "E", whatever type of game. Therefore, do not believe in the logo. The safest step is to visit www.esrb.org  write her titles in the search field, and you will find a real game age ratings and rating reasons for granting it.

Quite easy to do right? So the parents no longer need to worry about the possibility of dizziness and a playable game content their children. Enough with 5 simple ways above, parents are able to actively supervise the games their children played. Let's create a healthy gaming environment for children.

Dont Forget to Visit : All About Games

Resources : Free games download
readmore »»  

Easy guide for parents to monitor children while playing games

It is no secret that the content in the game often does not correspond with the children and the development period. Violence, nudity, violence, until the scene "adult" exposure-prone in children if the parents are not able to supervise and work around.

However, parents themselves may not be able to continue to accompany his son to play because the other busyness. What then then need to forbid children to play games to avoid this from happening? Own research shows children who play video games automatically train the fine motor skills, ability to recall, problem solving skills, ability to learn the language. And of course most importantly, children can feel happy about it.

Parents do not really worry too much, because we'll give you five tips that will make it easier for parents to supervise, control, or even the "censorship" of their children played games that can be done quickly and easily.


Communicate with Children

Good way is to let the child to supervise themselves. Parents can communicate with the child, what kind of game content has not been matched with themselves and the reason is so that children can learn to mature and do the "censorship" of the games he played himself. Parents themselves also have to tolerate the extent to which the game may be played or not.

All parents may not want their children to play games that have violent content, but that does not mean all games have violent content and then banned it? Give tolerance and understanding of violence such as what is allowed (eg fighting game) and what kind of violence should not be played (eg: full of mutilation).


Read Review about Your Child's Game is Played

Parents must be pro-active to get to know and learn more about the games played by their children. Being passive means that increase the risk of your child's exposure to inappropriate content in the game. Parents need to actively surfing the internet and dig as much information about the game being played by their children.

Parents can read the reviews of those games to get an overview about the types of games and content, then decide if the game is compatible with their child, or should do "censorship" against him. Jagat Review itself also reviews the latest games on the market.

Choose the Right Games Console

Parents are often confused to choose the right gaming console for his son because of the different variants of consoles available on the market. Each console has its own advantages and disadvantages, and often parents do not understand much about it. So what to do? Console what to choose?

Actually, parents can choose the console that suits their child's age. Some console games are designed to prefer the side and hence lots of fun games available are the games that put an element of fun and not the content of "heavy" and "mature" other. Parents can choose the Nintendo Wii or Nintendo DS for it. But that does not mean all games in the Nintendo Wii and Nintendo DS would fit with the kids. Wii and DS rather minimize the possibility of exposure to negative content. Both the console itself has a game with a variety of game genres and not everything is perfect with children. Following tips will help you select the game itself.


Maximize Video Sites for Getting the picture

If you read the review in writing can not provide a clear picture of the types of games and game content, the parents can switch to using free video sites like YouTube to get a more precise picture. Such sites usually provide pieces of videos taken directly from the game itself, so that parents can learn about the form of games and content available therein. It's easy, simply by adding the words "Gameplay" behind the name of the game title in the search field is available. Example: "Resident Evil 5 Gameplay", "Klonoa 2 Gameplay", or "Grand Theft Auto Gameplay" and so on according to the title game being played your child.


Visit ESRB (Entertainment Software Rating Board)

The ESRB is an independent agency that provides age ratings on games that are currently circulating in the world than any console. ESRB can be a valid and reliable reference for information related to the game that your child is being played. ESRB game itself divides into six age categories C (Children / Children), E (Everyone / Everyone), E 10 + (Everyone or aged over 10 years), T (Teen / Youth), Mature (Adult / 18 +), and Adult Only (Games that have an explicit pornographic content). Usually parents will find these letters on the front page cover of the game.

One thing worth noting, because in Indonesia most of the games in circulation is pirated or copied, it is not surprising cover of the game and the ESRB rating is also "modified" in such a way. Therefore, in general you'll find in all the games that circulate here is the rating "E", whatever type of game. Therefore, do not believe in the logo. The safest step is to visit www.esrb.org  write her titles in the search field, and you will find a real game age ratings and rating reasons for granting it.

Quite easy to do right? So the parents no longer need to worry about the possibility of dizziness and a playable game content their children. Enough with 5 simple ways above, parents are able to actively supervise the games their children played. Let's create a healthy gaming environment for children.

Dont Forget to Visit : All About Games

Resources : Free games download
readmore »»  

Sunday, May 16, 2010

What is Scribd and SlideShare?

Greetings,

Today I am excited to share with you Scribd.com and SlideShare.com in greater details. These are both web sites where you can download or share valuable resources. Ok, let's get started with Scribd.com. If you click on the picture below, it will take you to the website.


Check out Scribd 101
or you can watch the video below.


Remember, if you are interested in creating your own blog, and publishing your own blog, it is as easy as clicking on this link below to get the instructions. http://mikejmoran.typepad.com/visual_media/2009/11/creating-a-blog-using-blogger.html or you can click on this link below to see the document http://www.scribd.com/doc/22339943/Creating-a-Blog-in-Blogger If you want to download the power point or PDF then you can become a member of http://www.scribd.com/ for free and download all types of free informational documents. You can post any online document to share with the community. You can also charge for people to download your document and you keep 80% of profit.

Now we are ready to talk about SlideShare. Slideshare is a web site where you can also download free resources.
If you click on the picture below, it will take you to SlideShare.


Check out SlideShare 101
or you can watch the video below.


Stay tuned for next week. I will be sharing with you how to download YouTube videos for your next presentation. Videos are always useful and helpful in getting your point across to your audience. See you next week.
readmore »»  

Sunday, April 11, 2010

The Flip Digital Video Camera Introduction: Part 1


Greetings,

We are all now rested after the long break. I took a break from last week in observance of Easter. We are ready to go again, full speed. I have been looking online for tutorials on the New Flip Digital Camera Software, and so far I am unable to find any. So I decided to create one.

The training on this new digital camera is usually a 6 hour class, so I am going to break it down in my blog into a 5 part series. In the series I will be posting pictures and videos I took with the camera. I will also post helpful video tutorials you can find online. I will also post helpful ideas on how to use your Flip digital camera with your students or for you own personal use. Ok, lets get started.

Here are the titles of the blog session topics I will be following over the next 4 weeks.

Week 1 or Today: Introduction and Session Breakdown

Week 2: Digital Video Cameras in the Classroom

Week 3: How to Use the Pocket Digital Video Camera

Week 4: Working with Video Footage and the Software

Week 5: Using Video Footage with Other Compatible Software

Make sure you let all your colleagues know that I will be continuing with week 2 on this topic next week. For now you might want to visit the web site http://www.theflip.com/ so you can get acquainted with the camera.

I recently saw comedian/singer and celebrity Jaime Foxx using the Flip digital camera at the Grammy award show a few months ago. I think he was recording one of the music acts. They showed him on TV holding up his flip digital camera. If celebrities are finding these cameras easy to use, then we can all learn to use them with ease for our own personal use.

I did a review about this camera a few months ago. If you have not read it, I recommend you read it before you go through this blog tutorial. It can be found by visiting my January 3, 2010 blog post, or you can just click here: The New Flip Camcord Camera by Pure Digital

Next week I will be blogging about how to use the digital video camera in the classroom with students. So don't forget to let all your colleagues know about my free technology blog. See you next week.
readmore »»  

Sunday, February 28, 2010

How to Create a Podcast or Vodcast Part 2 of 3

Hello,
Today I will be covering the following steps:

3. Installing Audio Software to Record Your Podcast
4. Using Audio Software to Record Your Podcast

So, let's get started with installing the audio software.

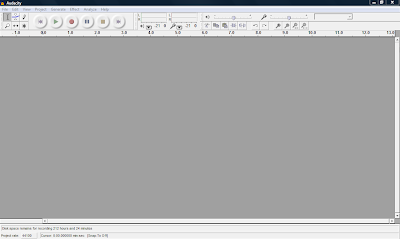
3. Installing Audio Software to Record Your Podcast: You want to use the best possible free software to edit and prepare your podcast. The one I recommend is Audacity. It's free and a very good sound editor. It can be found by clicking on the picture above. Once you go to the site you want to download Audacity 1.2.6 Once you get to the site you will want to choose Audacity 1.2.6 installer and if the download does not begin, choose the option direct link Save the file to your desktop. When you are using the software in Audacity you will need to convert your sound files to an Mp3 and you will need to download the LAME encoder by going to LAME Mp3 Encoder Once you visit the site, you will need to choose the operating system you are using, then click on the LAME download page Toward the bottom of the page you will see the following picture. Click on the appropriate link on the site, and save it to your desktop. Next, you will go to your desktop and double click on the icon and it will ask you to run it, click run and follow the instructions. You will want to remember where you saved it, usually it will be in your Program files menu. Next, double click on the audacity icon on your desktop and you will see the following:

Open Audacity and click on Edit -> Preferences -> File Formats Now this is what you will see. Click on Find Library and follow the instructions. (Here is where you want to find the LAME Mp3 Encoder file, remember it is under Program Files)

4. Using Audio Software to Record Your Podcast: Once you have your software and the Lame Mp3 encoder is installed you are ready to test your microphone. You can either use a headset with a microphone or you can use a microphone and your computer speakers. Plug in your microphone or headset. The microphone is usually the red jack and the headphones is usually the black jack. Go to Start -> Control Panel and double click on Sounds and Audio Devices. Next, click on the Voice tab and click the Test Hardware button. Follow the instructions to test your microphone. For additional tips on settings to make your recordings great visit the following site Great Tips on Recording When you are in Audacity make sure "Microphone" is selected as the recording source in the drop-down menu on the mixer toolbar.

Go to Edit -> Preferences -> On the Audio I/O tab make sure your sound card is selected as the device for playback and recording. In the Channels drop-down box under Recording, choose 1 (Mono). You can use stereo if you want but it will make your file larger and you want to try and keep it as small as possible. Under the Quality tab make sure you choose 44,100Hz as the Default Sample Rate and 16-bit as the Default Sample Format. Under the File Formats tab make sure you choose WAV (Microsoft 16 bit PCM) as the Uncompressed Export Format.

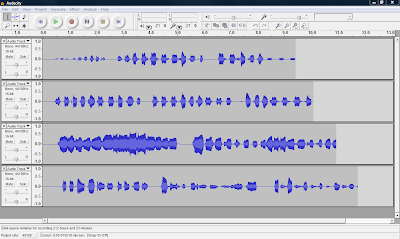
Now you are ready to record. Check on the microphone Meter toolbar in Audacity and you should see a red level indicator moving when you start recording. You can talk into the microphone and make adjustments to the volume until it looks like the picture below.


Now, your almost ready to record. Down below in the picture you will see the featured buttons to start your recording.


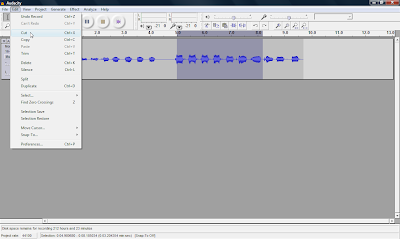
Simply push the Record button and you can start talking. When your done recording press the yellow square button to Stop the recording. If you want to edit your file, where you want to cut out parts of your recording or delete parts. You simply edit out parts by clicking and dragging to highlight the part you want to remove. Select Edit and choose either Cut or Delete. The part you want to edit will turn a grey shaded color. If you want to keep only one section of a recording, highlight that section and select Trim from the Edit menu. Take a look at the picture down below and you will see how to edit your clip.

You can also record many multiple tracks to add to your podcast, which is one of the many features you can't do with movie maker 2.Ok, next week I will be talking abou the final steps in your podcast, step 5. Turning your Podcast into a Vodcast and step 6. Publishing and Promoting. I will also be covering how to add music to your podcast and how to convert your WAV file to an MP3 so you can post online. See you next week.
readmore »»  

Friday, December 3, 2004

Making Your Own Template

You have an image which you would like to use as a background for your template? If so, then follow these steps.

1. Download one of the templates below depending on your preference.
Download the dark template for dark colored images and the light one for light colored images.
Unzip the downloaded file.

2. Upload your image to a free image hosting site like http://imageshack.us/
Select the' Do Not Resize' option before uploading

3. Copy the Direct Link provided after the upload

4. Open the downloaded template file in any text editor like Notepad
Search for INSERT LINK HERE and replace it with the image link

5. Save the file. Your template is now ready, see the Using the Template tutorial on how to apply the template to your blog.
readmore »»  

Thursday, November 25, 2004

Using the Template

For further assistance email bloggerdesigns [at] gmail [dot] com

1. Click on the Get Template link to download the ZIP file containing the template.


2. Unzip the file, there will be 2 files inside, the Readme.txt and one more txt file with the template code.

3. Login to your blogger account and go to Design -> Edit HTML

4. Click on Download Full Template to save your existing template

5.  Click on Choose File and select the file with the template code.

6. Click Upload

7. If you get the below message Click on Keep Widgets.


8. Your template is now ready.

9. Go to Template Designer -> Advanced tab to customize the colors and fonts of your new template.

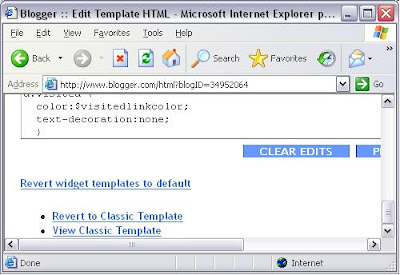
10. If you receive the following error message 'Your template could not be parsed as it is not well-formed. Please make sure all XML elements are closed properly.
XML error message: The markup in the document preceding the root element must be well-formed.' scroll down the page and click on Revert to Classic Template.

readmore »»