
Sunday, February 28, 2010

How to Create a Podcast or Vodcast Part 2 of 3

Hello,
Today I will be covering the following steps:

3. Installing Audio Software to Record Your Podcast
4. Using Audio Software to Record Your Podcast

So, let's get started with installing the audio software.

3. Installing Audio Software to Record Your Podcast: You want to use the best possible free software to edit and prepare your podcast. The one I recommend is Audacity. It's free and a very good sound editor. It can be found by clicking on the picture above. Once you go to the site you want to download Audacity 1.2.6 Once you get to the site you will want to choose Audacity 1.2.6 installer and if the download does not begin, choose the option direct link Save the file to your desktop. When you are using the software in Audacity you will need to convert your sound files to an Mp3 and you will need to download the LAME encoder by going to LAME Mp3 Encoder Once you visit the site, you will need to choose the operating system you are using, then click on the LAME download page Toward the bottom of the page you will see the following picture. Click on the appropriate link on the site, and save it to your desktop. Next, you will go to your desktop and double click on the icon and it will ask you to run it, click run and follow the instructions. You will want to remember where you saved it, usually it will be in your Program files menu. Next, double click on the audacity icon on your desktop and you will see the following:
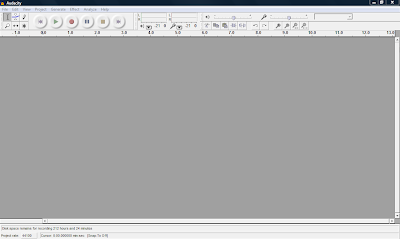
Open Audacity and click on Edit -> Preferences -> File Formats Now this is what you will see. Click on Find Library and follow the instructions. (Here is where you want to find the LAME Mp3 Encoder file, remember it is under Program Files)

4. Using Audio Software to Record Your Podcast: Once you have your software and the Lame Mp3 encoder is installed you are ready to test your microphone. You can either use a headset with a microphone or you can use a microphone and your computer speakers. Plug in your microphone or headset. The microphone is usually the red jack and the headphones is usually the black jack. Go to Start -> Control Panel and double click on Sounds and Audio Devices. Next, click on the Voice tab and click the Test Hardware button. Follow the instructions to test your microphone. For additional tips on settings to make your recordings great visit the following site Great Tips on Recording When you are in Audacity make sure "Microphone" is selected as the recording source in the drop-down menu on the mixer toolbar.

Go to Edit -> Preferences -> On the Audio I/O tab make sure your sound card is selected as the device for playback and recording. In the Channels drop-down box under Recording, choose 1 (Mono). You can use stereo if you want but it will make your file larger and you want to try and keep it as small as possible. Under the Quality tab make sure you choose 44,100Hz as the Default Sample Rate and 16-bit as the Default Sample Format. Under the File Formats tab make sure you choose WAV (Microsoft 16 bit PCM) as the Uncompressed Export Format.

Now you are ready to record. Check on the microphone Meter toolbar in Audacity and you should see a red level indicator moving when you start recording. You can talk into the microphone and make adjustments to the volume until it looks like the picture below.


Now, your almost ready to record. Down below in the picture you will see the featured buttons to start your recording.


Simply push the Record button and you can start talking. When your done recording press the yellow square button to Stop the recording. If you want to edit your file, where you want to cut out parts of your recording or delete parts. You simply edit out parts by clicking and dragging to highlight the part you want to remove. Select Edit and choose either Cut or Delete. The part you want to edit will turn a grey shaded color. If you want to keep only one section of a recording, highlight that section and select Trim from the Edit menu. Take a look at the picture down below and you will see how to edit your clip.
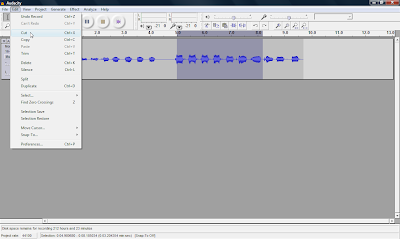
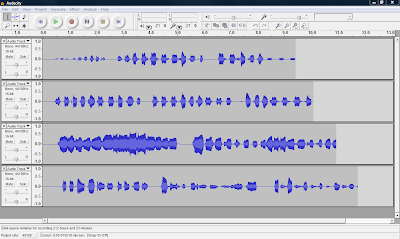
You can also record many multiple tracks to add to your podcast, which is one of the many features you can't do with movie maker 2.Ok, next week I will be talking abou the final steps in your podcast, step 5. Turning your Podcast into a Vodcast and step 6. Publishing and Promoting. I will also be covering how to add music to your podcast and how to convert your WAV file to an MP3 so you can post online. See you next week.
readmore »»  

Sunday, February 21, 2010

How to Create a Podcast or Vodcast Part 1 of 3

Greetings,

Today I am blogging about podcasting and vodcasting. According to wikiipedia, podcasting is defined as a series of digital media files (either audio or video) that are released episodically and downloaded through web syndication. It is a series of digital audio files, usually MP3 that can be downloaded on a regular basis automatically. It's kind of like having your own radio station and you are the broadcaster. Vodcasting or Videocasting is defined as online delivery of video, or using still digital pictures in a video. There are four steps to creating a podcast: plan, produce, publish, and promote. The detailed steps into creating a podcast include the following stages:

1. Planning

2. Gathering Ideas

3. Installing Audio Software to Record Your Podcast

4. Using Audio Software to Record Your Podcast

5. Turning your Podcast into a Vodcast

6. Publishing and Promoting

This blog will break down these steps in a 3 - 4 week blog episode. In this blog episode I will be discussing the first 2 steps. 1. Planning and 2. Gathering Ideas

1. Planning: When you start to create a podcast you need to plan what you are going to say by scripting your words. You might want to have an introduction and a welcome. After you have your script then you can practice recording it. You want it to sound like a radio broadcast or a radio show. When you start a podcast it is important that you continue to create new and regular episodes for your listeners. If you are planning on your students to create podcasts, then you need to monitor the planning process to make sure students are well prepared before recording their podcast.

If you are going to create a podcast or vodcast, and put your students' voices in the project and upload them to the internet, then you are going to need a podcast/vodcast permission slip for their parents to sign. You also want to include a brief detail of what a podcast is, (this will educate the parent) and how only the voices will be used. Now, back to planning your podcast: Here are a few questions you want to ask yourself while you are planning your podcast. What do you want to communicate to your listeners? What do you want your students to communicate in their podcast? How often do you want your students to create a podcast? What do you want to teach your listeners? What type of action do you want your listeners to take during the podcast?

2. Ideas: What topic or idea do you want to share with your listeners? You want to create a 3 -5 minute podcast for your listeners maybe once a week or once every 2 weeks. You want your listeners to always want more from your future podcasts. Here are some additional web sites of sample podcasts:

Elementary Schools:
http://www.kid-cast.com/
Willowdale Elementary School
Wells Elementary School
Jamestown Elementary

Middle Schools:
Harrington Middle School
Mabry Middle School
Twin Valley Middle School

High Schools:
Amphitheater High School
Coral Gables High School
Briggs High School

Educational Podcast Directory You can also go to Itunes and search for student podcasts. You can also go to google and search for podcasts as well. Here is a Podcast Legal Guide you may want to review to make sure you follow all the legal guidelines in podcasting http://wiki.creativecommons.org/Podcasting_Legal_Guide

Here are 25 more ideas that you may want to think about for your podcast or vodcast:
1. Visit http://www.pppst.com/ – This site has thousands of teaching PowerPoints that can be used for Podcasting
2. Talking books
3. Having students read a book
4. Vocabulary lessons
5. Oral tests
6. Test Reviews
7. Spelling lists
8. Pledge Allegiance
9. Numbers and Alphabet songs
10. Recording lectures
11. Introduction to staff
12. Faculty meetings
13. Communications to parents and community
14. Homebound lessons
15. Announcements
16. Lecture notes
17. How to:
a. Check out books in the library
b. How to use the Grade book program
c. Validate grades
d. Fill out forms
e. Do a certain project
18. Book reviews
19. Field trips
20. Student forms
21. Staff Development
22. Dictation
23. Student information
24. Registration information
25. Senior information

Hope these ideas help you out, as you plan your podcast. Next week, I will cover step 3. Installing Audio Software to Record Your Podcast and step 4. Using Audio Software to Record Your Podcast. See you next week.
readmore »»  

Monday, February 15, 2010

LiveWire2.0 - Premium Wordpress Template

Live Wire Premium TemplateTitle: Live Wire 2.0

Author: WooThemes

Category: Wordpress Template

Tags Cloud:
professional wordpress template, wordpress template, Live Wire WooThemes, wordpress premium template, premium template, web 2.0 template, wp theme, Live Wire, wordpress theme, magazine style, premium wordpress template


Descriptions:

Live Wire is a magazine-type Premium Wordpress theme that is packaged with an impressive variety of designs and colour options that should make it appealing to just about any type of web publisher. It’s theme option’s panel entitles even the most novice of users to customize it’s flexible layout.

Features:

  • 3 different Live Wire styles, each with 3 different colour options to choose from.
  • Unique styling for the main featured articles & secondary articles on the homepage;
  • The middle column on the homepage displays the latest content from all your categories, thus emphasising all the most important content and increasing the time users will spend on your site; and
  • Multiple homepage layouts.

Demo: Earn Money Info

Link: Live Wire by WooThemes


readmore »»  

Sunday, February 14, 2010

Free Resources You Can Download and Use in Your Classroom!

Greetings Colleagues,

Today I am blogging about a Great web site where you can find free, and valuable resources that other teachers have created and posted. You can sign up and join the community for free. When you sign up, you can search for all types of Microsoft Word, Excel, and Power Point documents, as well as pdf's. You will find many forms on classroom management, behavioral reward systems and behavioral contracts. I personally have searched the site for many useful documents that I have shared with other teachers. Just click on the picture to the left of this post to get started. Here is a list of 10 additional resources you will find on the site:

1. Beginning Teacher & Professional Development
2. Teaching Practices
3. Classroom Management
4. Managing Student Centers
5. Homework Ideas
6. Writing Ideas
7. Seasonal and Holiday Ideas
8. Science, Social Studies, Math, Reading, Language Arts Ideas
9. Technology Ideas
10. Visual and Performing Arts Ideas

Hope you enjoy the site. This is probably one of the most comprehensive collections of helpful documents I have found. When you get a chance, sign up for a free account and search for many ideas that you can use in your classroom. Hope this helps. Next week I will be blogging about podcasting and vodcasting. See you next week.


readmore »»  

Sunday, February 7, 2010

How to Copy and Paste

Hello,

Today I will be video blogging about how to copy and paste information from the internet into a Microsoft Word document. This will also work when you are copying and pasting information from another document into another document. A few weeks ago I was teaching elementary students how to copy and paste and they loved it. Simply push play on the player below and you can follow the instructions. Don't forget in a few weeks I will be blogging about podcasting and vodcasting. I will also be filming more helpful video clips to post online. Hope this helps. See you next week.


readmore »»  

Tuesday, February 2, 2010